Overview
In the Hours and booking system tab, you can define your restaurant’s opening hours and decide whether guests can make reservations through the app. You can also select the booking system that best fits your operational needs.
This article will guide you through configuring these options to ensure guests have access to the right information and features.
Before getting started
Before setting up the opening hours and booking system, consider the following:
- You need access to the CMS at Content > Facilities > Restaurants.
- Decide whether the restaurant will allow reservations via the app or only display its schedule.
- Prepare the opening hours and time slots in which the restaurant will operate.
- If you choose to accept reservations, review the available booking systems and select the one that best suits your operations.
Step-by-step guide
Step 1: Define the opening hours
If you only want to display the restaurant’s opening hours without allowing reservations in the app, follow these steps:
- Go to Content > Facilities > Restaurants and select the restaurant.
- Click Edit.
- Open the Hours & booking system tab.
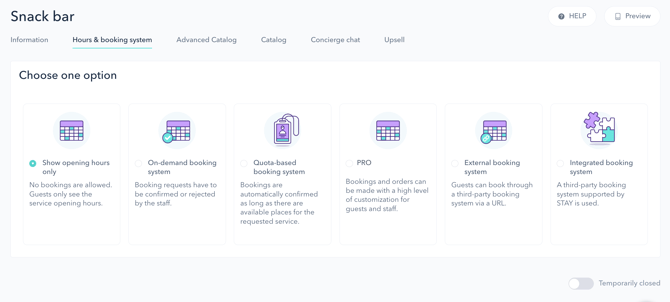
- Select the option Show opening hours only.
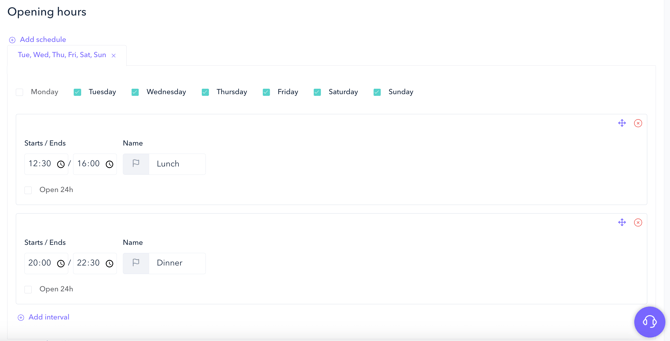
- Define the time intervals and the days of the week the restaurant will be open.
- Enter a name for each time interval.
- If the restaurant operates 24/7, check the Open 24h box.
- If the restaurant will be temporarily closed, activate the Temporarily closed option.
- Click Save changes.
Step 2: Choose a booking system
If you want to allow reservations through the app, select a booking system. In the Hours & booking system tab, choose one of the following options:
- On-demand booking system
- Guests submit a reservation request.
- The hotel staff can accept or reject the request. They can also modify it before or after confirmation.
- Quota-based booking system
- Reservations are automatically confirmed until the available quota per frequency is reached.
- PRO booking system
- An advanced reservation management system that allows you to set availability, restrictions, guest types, and detailed tracking of each booking status.
- This system enables designing, viewing, and controlling the inventory of bookable units and spaces.
- If you are interested in this option, contact STAY at support@stay-app.com.
- PRO ordering system
- Allows guests to place food and drink orders through the app and track their status.
- To activate this system, contact STAY at support@stay-app.com.
- External booking system
- Redirects guests to a third-party booking system via a link.
- Integrated booking system
- Enables the integration of external reservation management tools with STAY.
- To request activation of this option, contact our team at support@stay-app.com.
Step 3: Configure the selected booking system
Depending on the chosen system, you’ll need to set additional parameters, such as:
- Defining available time intervals and days of operation.
- Specifying restaurant capacity (for quota-based systems).
- Setting minimum and maximum advance booking times.
- Configuring prices and offers.
- Adding staff email addresses for reservation management.
- Customizing automatic messages for booking confirmations or rejections.
For detailed setup instructions for each system, refer to the articles dedicated to each option.
Next steps
Once you have set the opening hours and booking system, you can continue with these configurations:
- Set up the restaurant menu: we recommend using the Advanced catalog for a more complete user experience.
- Enable Concierge chat: Activate Concierge chat to allow guests to ask questions directly through the app.
- Review the app display: Use the Preview button in the CMS to check how guests will see the opening hours and booking system in the app.
Need further assistance?
If you have additional questions or require further assistance:
- Contact us via live chat
- Send a ticket to our Support team
- Visit STAY Academy, our training platform.