Overview
The quota-based booking system allows guests to make reservations at a restaurant without requiring staff confirmation. The system manages a maximum number of bookings based on a set frequency (quota), ensuring that reservations are accepted until the capacity is reached. Once the limit is met, no additional bookings will be allowed for that specific time.
Unlike the on-demand booking system, guests can cancel their own quota-based reservations after they have been confirmed.
Before getting started
Before configuring the quota-based booking system, ensure you have:
- Access to the CMS: Content > Facilities > Restaurants.
- A clear understanding of the restaurant’s seating capacity and time intervals.
- Defined frequency for bookings (e.g., every 30 minutes).
- A list of emails for staff members who should receive booking notifications.
Step-by-step guide
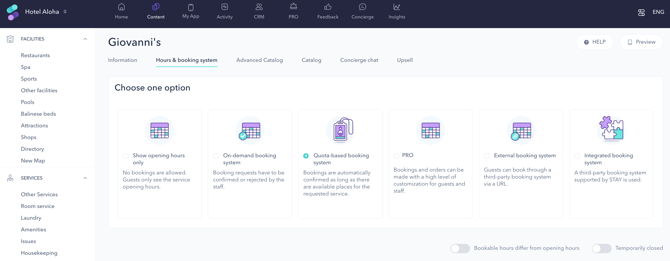
Step 1: Enable the quota-based booking system
- Navigate to Content > Facilities > Restaurants.
- Hover over the restaurant you want to configure and click Edit.
- Go to the Hours & booking system tab.
- Select Quota-based booking system.
Step 2: Define the opening hours
- Define the time intervals and the days of the week the restaurant will be open.
- Enter a name for each interval.
- If the restaurant operates 24/7, check the Open 24h box.
- If the restaurant will be temporarily closed, activate the Temporarily closed option.
- Click Save changes.
If bookable hours differ from opening hours, activate the toggle button on the right side. A separate section will appear for defining the bookable hours of your restaurant. If you don’t activate this toggle button, it means both opening and bookable hours are the same.
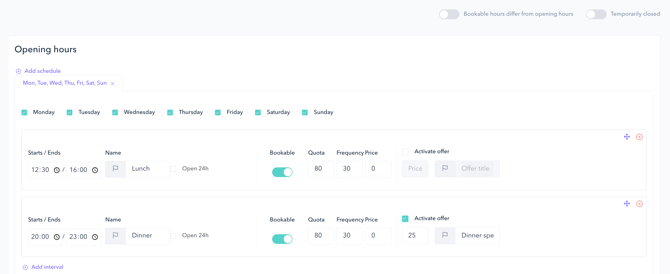
Step 3: Set up booking intervals and quota
-
Define the time intervals and the days of the week the restaurant will be bookable.
-
Enter a name for each interval.
-
Turn on the Bookable switch for the desired intervals.
-
Set the quota – In the Quota field, enter the maximum number of guests (or units) that can book based on the frequency you set.
Example: quota of 30 people every 30 minutes.
-
In the Frequency field, define the pacing by which booking times are offered to customers (in minutes).
Example: If an interval is from 10:00 to 11:30 and you set a 30 minutes frequency, guests can book at 10:00, 10:30, 11:00, and 11:30.
-
Optional: If your restaurant has a fixed price per person or booking unit for the provided service, enter it in the Price field. The price will be displayed to guests when they make a reservation.
Step 4: Set up offers (optional)
- Click the Activate offer check box.
- Enter an offer description in all available languages (click the flag icon to add translations).
- Enter the offer price.
Step 5: Configure advanced options
To access additional options, activate the Advanced options switch.
-
Maximum advance booking time: Set the maximum number of days guests can book in advance.
Example: If you set a maximum of 2 days in advance, dinner bookings for a Wednesday can start on Monday.
-
Minimum advance booking time: Define the minimum number of minutes required before making a reservation. Choose between the service opening time and booking time as a reference.
Example: If set to 120 minutes before booking time, and it is now 17:00, the earliest bookable time will be 19:00.
-
Booking unit:
- By default, bookings are made according to the number of people.
- If you want guests to book tables instead of people, select Custom and enter “Tables” in the text field.
- Click the flag icon to add translations.

Step 6: Customize automated responses
- Confirmation message after booking: Enter the message guests receive when their booking is received.
- Booking button text: Customize the text displayed on the Book button in the app (keep it short, ideally one word).
- Comments field text: Customize the instructions shown above the comments box when guests make a reservation. Example: “Please indicate if you prefer a table inside or outside.”
- Message indicating no availability: Customize the text displayed when there is no availability.
Step 7: Configure cancellation policy (optional)
- Enable booking cancellation policy: If you want to display a cancellation policy, activate this switch and enter the policy text.
- Enable Acceptance of the cancellation policy is mandatory checkbox: If activated, guests must check this box to acknowledge the cancellation policy before booking.
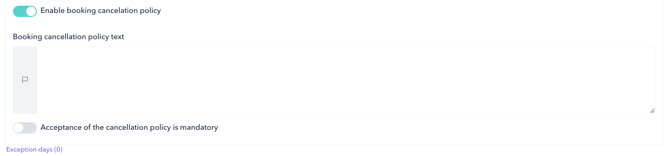
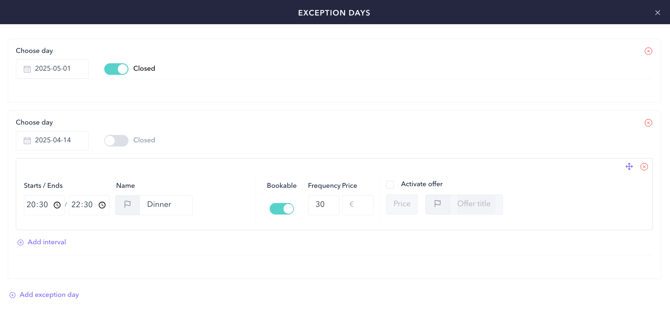
Step 8: Add exception days (optional)
You can set exception days to override the regular schedule. This feature is useful when the restaurant hosts a private event or needs to close for maintenance during specific hours on a given day.
To configure exception days, click on Exception days (blue link). A window will open where you can add dates with modified hours or mark the restaurant as fully closed for the day.
- Click on the date field to open the calendar and select a date.
- If the restaurant will be closed all day, check the Closed box.
- If the restaurant will remain open for part of the day, click Add interval:
- Define the interval and assign it a name.
- Enable the Bookable switch if you want guests to make reservations during this period.
- If needed, add more intervals for that day.
- To add another exception date, click Add exception day.
- Close the window and click Save changes to apply the configuration.
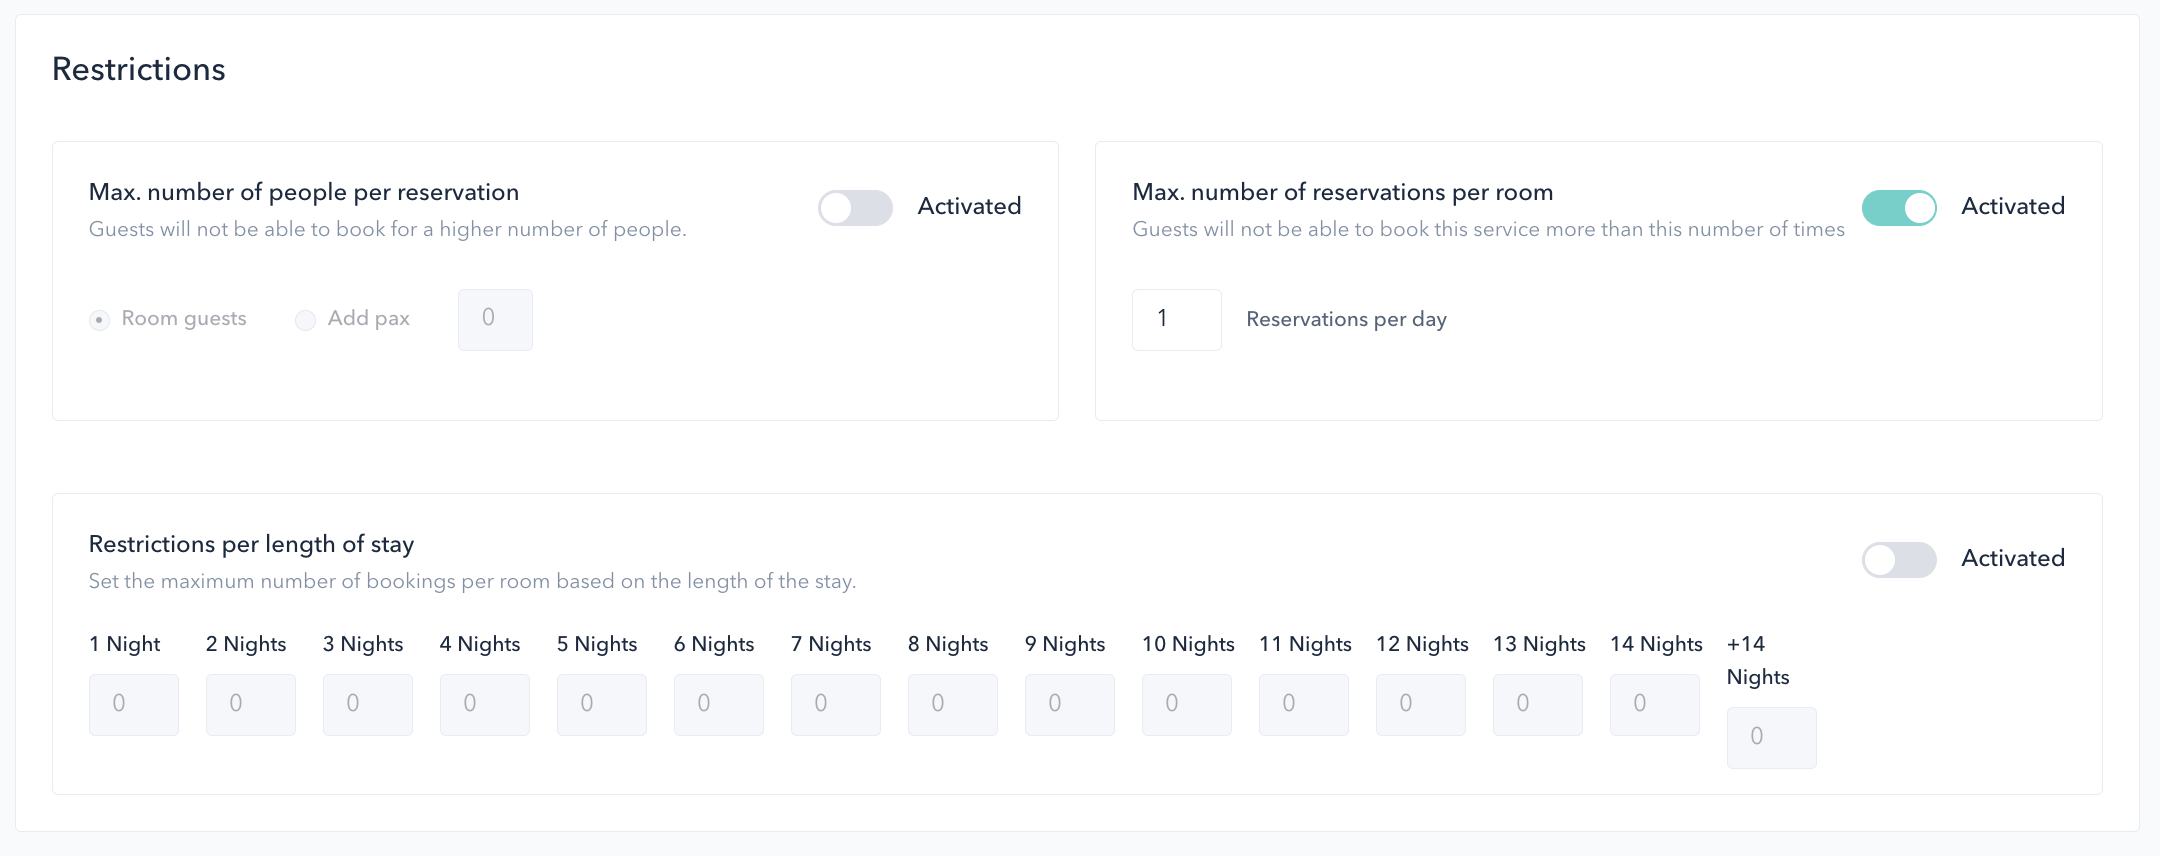
Step 9: Define restrictions
There are three types of restrictions you can apply:
-
Limit the maximum number of people per reservation: Guests will not be able to book for more than the specified number of people. You can either limit it based on the number of guests per room or set a specific maximum number of people per reservation.
Important: The value related to the number of guests per room can be used if your PMS is integrated with STAY and sending this data. Otherwise, this restriction cannot be applied.
-
Limit the maximum number of reservations per room: Guests will not be able to book this service more than the specified number of times per day.
-
Set the maximum number of reservations per room based on the length of stay:
Example: For a 3-day stay, a total of 5 reservations are allowed.
To apply any of these restrictions, click the activation toggle next to the desired option and enter the corresponding number.
Note: These restrictions apply only to the restaurant you are editing.
Step 10: Assign staff for booking management
- At the Emails of the staff members who manage bookings for this service section, click Add email.
- Enter each email address individually and press Enter.
- Staff members will receive an email notification when a new reservation is received.
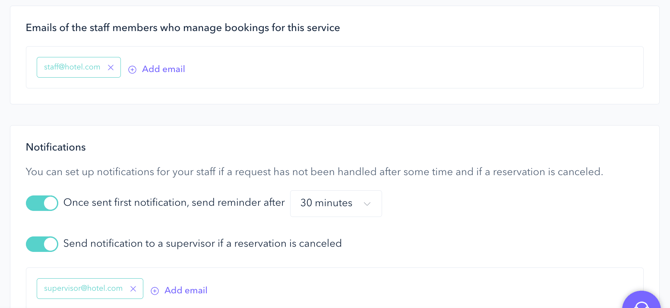
Step 11: Define notifications options
Set up notifications for your staff if a reservation is canceled.
- You can send a notification to a supervisor if a reservation is canceled.
Step 12: Save changes
Once all settings are configured, click Save Changes to apply them.
Next steps
After configuring the quota-based booking system, you may want to:
- Test the booking process – Try making a reservation as a guest to ensure it works as expected.
- Make your restaurant visible on the app front page to start receiving bookings.
- Monitor reservations in the CMS – Review bookings under Activity > Services quota bookings.
- Train your staff – Ensure your team understands how the quota-based booking system works and how to assist guests with bookings.
Need further assistance?
If you have additional questions or require further assistance:
- Contact us via live chat
- Send a ticket to our Support team
- Visit STAY Academy, our training platform.