Overview
The quota-based booking system allows guests to make reservations at a restaurant without requiring staff confirmation. The system automatically manages a set quota and stops accepting bookings once the limit is reached. This ensures efficient seat allocation and prevents overbooking.
Unlike the on-demand booking system, guests can cancel their own quota-based bookings after they have been confirmed.
This article explains how to manage restaurant bookings made through the quota-based system in the CMS, via email and with the staff app.
Managing reservations in the CMS
Step 1: Viewing quota-based bookings
- Navigate to Activity > Services quota bookings in the CMS.
- Select the restaurant from the drop-down menu.
- Choose the date to view all confirmed bookings for that day.
- Use the filters to refine the results by interval.
- Bookings are grouped per reservation time. You can see the occupancy of each time and the number of guests who attended.
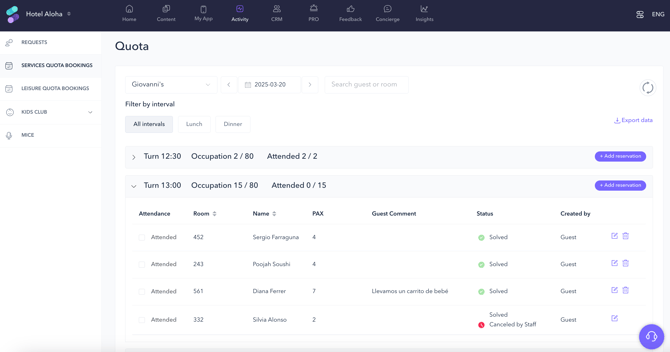
Step 2: Managing reservations
-
To modify a booking:
- Locate the reservation in the list.
- Click the edit button (pencil icon).
- Update the guest details, date, time, or number of people.
- Click Save changes.
-
To cancel a booking:
- Locate the reservation in the list.
- Click the Cancel button (trash icon).
- Confirm the cancellation.
- The guest will receive a cancellation notification.
-
To update attendance information:
- Locate the reservation in the list.
- Tick the Attended checkbox.
- The number of guests who attended will update in the reservation time heading.

-
Send a message to the guest:
If you need to share additional information with the guest, you can send a message.
- Locate the reservation in the list.
- Click the Edit button (pencil icon).
- Type a message in the Additional info for customer text box.
- Click Save changes.
- The guest will receive a notification.
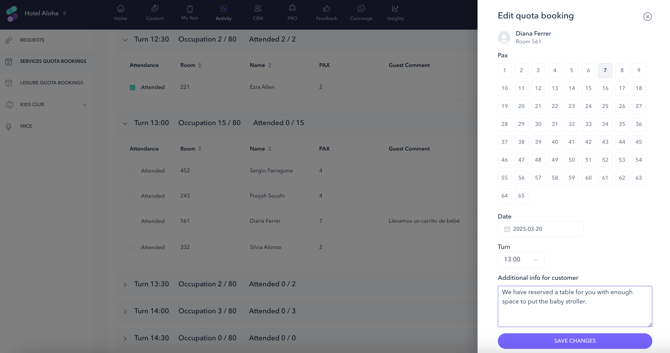
Important: Note that the guest cannot answer these messages.
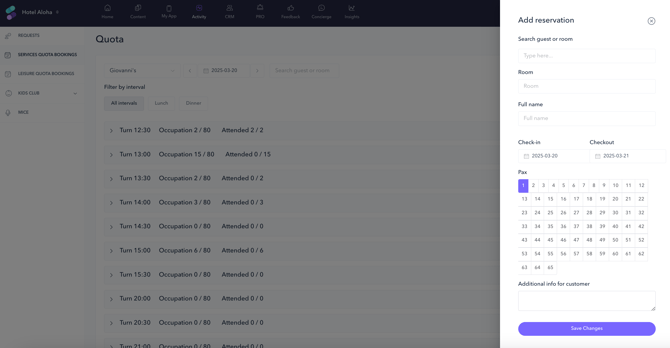
Step 4: Adding a new reservation
If a guest requests a booking by phone or in person, you can manually add the reservation in the CMS.
- Click Add reservation.
- Fill in the booking details (guest name, date, time, number of people, etc.).
- Click Book to confirm the reservation.
This ensures that all reservations—whether made through the app or manually—are properly recorded and managed.
Managing reservations via email
If you have configured email notifications for quota-based bookings, hotel staff will receive an email each time a guest makes a booking. The email allows staff to be aware of new bookings or cancellations.
Step 1: Access the email notification
- Open your email inbox and look for the notification from STAY.
- The email contains details such as:
- Guest’s name
- Room number
- Check-in and checkout dates
- Date and time of the booking
Important:
With the quota-based booking system, email notifications are for informational purposes only. Any changes to a reservation must be made directly in the CMS.

Managing reservations with the staff app
If your hotel staff uses the STAY staff app, they can also manage quota-based bookings from their smartphones.
Step 1: Download the staff app
- iOS: Download from App Store
- Android: Download from Google Play
Step 2: Sign in to the staff app
- Use the same credentials as the CMS.
- If managing multiple properties, select the correct hotel by tapping the Menu button on the top left corner, and then Search hotel.

Step 3: Viewing quota-based reservations
- Tap the Services quota bookings section from the left-side menu.
- Select the restaurant in the drop-down menu.
- Choose the date to view all confirmed bookings for that day.
- Bookings are grouped per reservation time. You can see the occupancy of each time.
Step 4: Managing reservations
-
To cancel a reservation:
- Tap on the reservation time to access the scheduled bookings.
- You will see all confirmed reservations for that time.
- Locate the reservation you want to cancel.
- Swipe left.
- Tap Delete (in red).
- Confirm the cancellation.
The reservation details will be removed, and it will disappear from the list. The guest will receive a push notification with the updated booking status.
-
To update attendance information:
- Locate the reservation in the list.
- Tap the Attended button. The check icon will turn green.

-
To add a new reservation:
If a guest requests a booking by phone or in person, you can manually add the reservation in the staff app.
- Tap Add reservation.
- Fill in the booking details (guest name, date, time, number of people, etc.). You can search by room number so guest details are automatically filled in.
- Tap Save booking to confirm the reservation.
This ensures that all reservations—whether made through the app or manually—are properly recorded and managed.

Important:
You cannot send a message to the guest who made a reservation from the staff app. To do so, you must go to the CMS.
Next steps
After managing quota-based bookings, you may want to:
- Monitor reservations regularly – Ensure the system is properly allocating seats.
- Train your staff – Make sure your team understands how the quota-based booking system works.
- Adjust quotas if necessary – Modify seat availability in Content > Facilities > Restaurants > Hours & booking system.
Need further assistance?
If you have additional questions or require further assistance:
- Contact us via live chat
- Send a ticket to our Support team
- Visit STAY Academy, our training platform.