Overview
The PRO booking system allows you to manage restaurant reservations efficiently from the CMS. You can view, modify, and update reservation statuses, track real-time availability, manually add reservations, and download reports.
This guide walks you through managing reservations with the PRO booking system, using the Reservations section of the CMS.
Before getting started
Before managing reservations, make sure you:
- Have already configured the restaurant in the CMS under Content > Facilities > Restaurants.
- Have enabled the PRO booking system for the restaurant.
- Have set up the bookable units (e.g., tables or seating areas), defined spaces and created at least one space combination.
- Have assigned an availability timetable to the service.
- Have access to the CMS: PRO > Reservations.
Step-by-step guide
Step 1: View reservations
- Go to PRO in the CMS.
- Select the service from the drop-down menu in the top-left corner.
- Choose a date on the calendar.
Step 2: Choose a view mode
You can switch between three viewing modes:
- Floor plan view (map icon)
- Displays a visual layout of the restaurant’s tables or units.
- Shows reservations for the currently active interval (e.g. Lunch if you access at 13:00). To view reservations from a different interval, use the filters menu to select the desired time slot.
- Displays a global occupancy indicator for the active or selected interval, showing occupied quota vs total quota and occupied units vs total units in real time.
- Allows you to check each reservation and modify its status in real time.
- Lets you filter by status, interval, and space, and sort the reservation list by earliest or latest.
- Displays guest comments and internal notes directly in the list, without needing to open each reservation.
- There is a visual interaction between the list and the floor plan. Selecting a reservation in the list highlights the corresponding table on the floor plan, and selecting a table highlights its reservation in the list.
- Allows you to navigate between spaces (e.g. dining room, terrace) using arrow buttons on either side of the floor plan.
- The floor plan commands allow you to adapt the visualization by reducing or enlarging the image, centering the units, displaying them in full screen, or freezing units on the floor plan to avoid losing sight of them.

- Calendar view (calendar icon)
- Displays reservations in a calendar view.
- Shows reservations for the entire day by default (not limited to a specific interval).
- Displays a global occupancy indicator, showing occupied quota vs total quota and occupied units vs total units in real time.
-
- Allows you to check each reservation and modify its status in real time.
- Helps you visualize the occupancy per interval for each unit.
- Lets you filter by status and space.
- The arrows let you scroll through the different units to view their bookings across the day.

- List view (list icon)
- Displays reservations and occupancy details in a structured list.
- Shows reservations from all spaces by default.
- Allows you to view reservations for the active interval or the full day, depending on the selected filters.
- Displays a global occupancy indicator for the active or selected interval, showing occupied quota vs total quota and occupied units vs total units in real time.
- Lets you filter by interval, space, and status.

Filters
You can refine the reservation list using the available filters:
- Sort by: Earliest to latest or vice versa.
- Status: Confirmed, Occupied, No-show, Finished, or Canceled.
- Interval: View reservations for a specific time interval.
- Space: View reservations for a specific space.
Available filters may vary depending on the selected view.

Step 3: Check and edit reservations
To find a reservation, you can:
- Select the date.
- Type the customer's name in the search bar (floor plan mode).
- Select a reservation in the list (floor plan view mode) to highlight the corresponding table on the floor plan, or select a table to highlight its reservation in the list.
- Browse the list view, select a reservation on the calendar or select a unit on the floor plan.
To edit a reservation:
- Click on the reservation.
- Modify any necessary details (date, number of people, space, time, unit or duration).
- Save the changes.
Tip - Editing reservations already in progress: Staff can update reservation details even after the reservation time has started. For example, if guests notify the restaurant that they will arrive later or that the number of guests has changed.
To update a booking status, select one of the following from the reservation detail window (Calendar or Floor plan view modes):
- Confirmed: The reservation is accepted.
- Occupied: The guest has arrived and taken their seat.
- No-show: The guest did not show up.
- Canceled: The reservation has been canceled.
To update the status to Occupied from the List view, check the Attended box at the beginning of the reservation line. This action marks the guest as arrived and automatically updates the reservation status to Occupied.
Important:
- A reservation can only be marked as No-show after the reservation time has passed.
- Once the reservation time has arrived, the reservation can no longer be canceled — it should be marked as No-show.
To add internal staff notes, use the Notes field (only visible to staff).
Note: If you have applied segmentation in your restaurant settings (using segmented quota), you will be able to see how many spots are occupied per segment in reservations, as well as the total number of spots occupied per segment for each time slot.

Step 4: Refresh to view the latest reservations
- Click the Reload icon (circular arrows) in the upper-right corner of the screen.
- Refresh regularly to ensure you’re seeing the most up-to-date list of reservations.
Step 5: Add a reservation manually
If a guest arrives without a prior booking, you can manually add a reservation:
- Floor plan view: Click +Reservation from the left menu or select an available unit and then Add reservation.
- List view: Click Add reservation on the right side of each available time.
- Calendar view: Click on an available time and unit and then Add reservation.
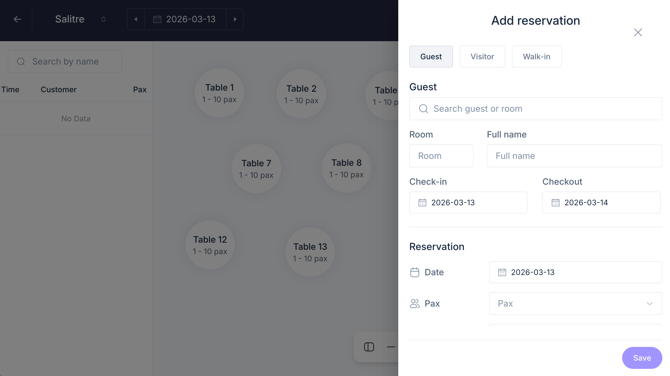
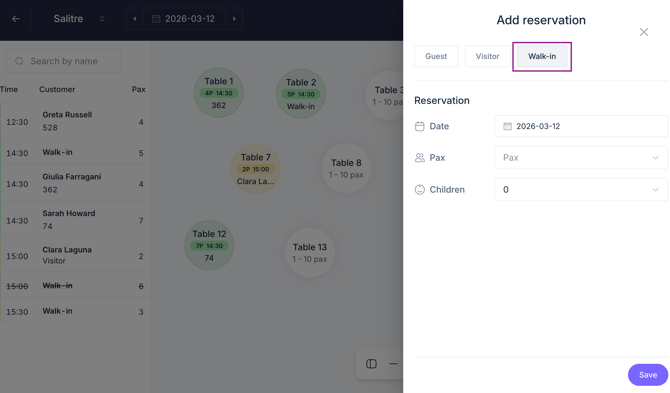
A form will appear where you can enter:
- Customer details (guest, visitor, or walk-in).
- Date and time of the reservation.
- Number of people.
- Assigned unit.
Click Save to confirm.
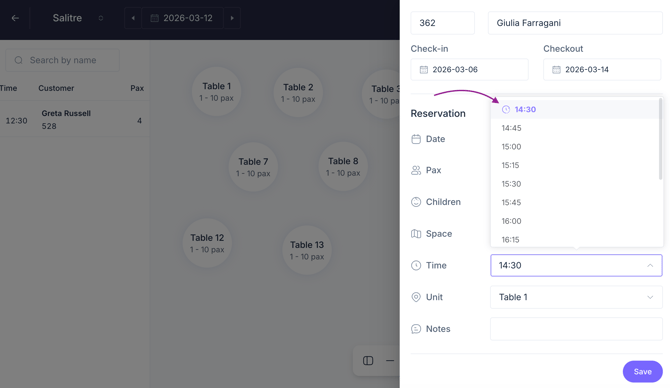
Tip - Adding a reservation during an ongoing time slot:
Staff can create a reservation even if the current booking time slot has already started. For example, if reservations are configured every 30 minutes, you can still add a reservation after the time slot has begun instead of waiting for the next one. When adding a reservation during an ongoing time slot, the system displays a message indicating when the reservation will end, so staff can take the remaining time into account.
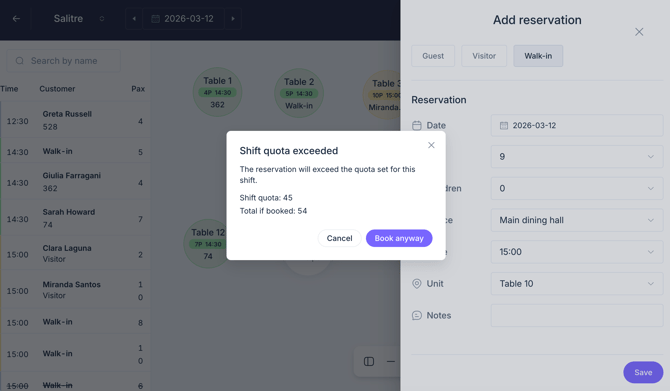
Exceeding the quota:
Staff can add reservations that exceed the quota defined in the Timetable tab (under Settings) for each interval (for example, 20 customers every 30 minutes).
If the quota is exceeded, the system displays a warning showing:
- the quota configured for that time slot, and
- how the quota will change if the reservation is added.
This action is only available to staff when manually adding a reservation. Customers cannot exceed the quota when booking through the app.
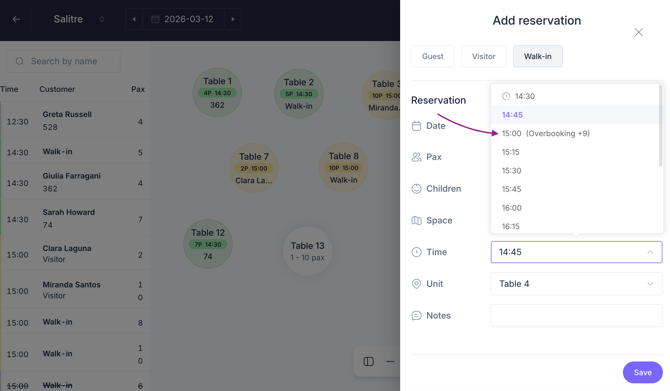
Walk-in customer type:
Staff can add reservations using the walk-in customer type. This option is only visible to staff and simplifies the process by requiring fewer details than the visitor type (no email address or phone number).
Step 6: Temporarily lock units
To prevent reservations for a specific table or unit during a set time:
- In the floor plan view, click on an available unit. In the calendar mode, click the desired time and unit.
- Select Lock unit.
- Choose the locking duration:
- Full day or multiple days (24 hours).
- Specific time range (start and end time).
- Add internal notes for staff.
- Click Save changes.
To unlock a unit, click on it and select Unlock unit.

Step 7: Manage reservations in real time
The floor plan and calendar updates unit statuses using color codes:
- White: Available.
- Yellow: Confirmed.
- Green: Occupied.
- Red: Late.
- Gray: Locked.
Automatic status updates:
- If a guest does not arrive within 5 minutes of the booking time, the unit turns red (late).
- If the guest arrives, update the status to occupied (green).
- If the booking is canceled or marked as no-show, the unit becomes available (white).

Step 8: Check availability
To see available times for a given date:
- Click Check availability (calendar with magnifying glass icon) in the top menu, where you select the service.

- Enter the date and number of guests.
- Enable the Check availability in app switch if you want this information to be visible to guests. If not enabled, this information is only visible to staff.
- View available times for all restaurants using the PRO booking system.

Step 9: Download a report
- Click Export data (down arrow icon on the upper right-side menu).
- Select the services you want to export data for.
- Select a date range.
- Select a format: XLSX or PDF.
- Choose between All reservations or Confirmed only.
- Click Download file.

Next steps
After you’ve started managing bookings, you may want to:
- Refine your setup – Adjust timetables, quotas, and space combinations based on operational needs.
- Train your staff – Make sure your team is confident using all three view modes (floor plan, calendar, list) and understands how to update booking statuses in real time.
- Promote your booking widget so visitors can reserve directly.
- Review performance with Insights – Use the Insights feature to view key metrics such as the number of bookings, revenue, and users. This can help you monitor how the service is performing and support data-driven decisions.
Need further assistance?
If you have additional questions or require further assistance:
- Contact us via live chat
- Send a ticket to our Support team
- Visit STAY Academy, our training platform.