Overview
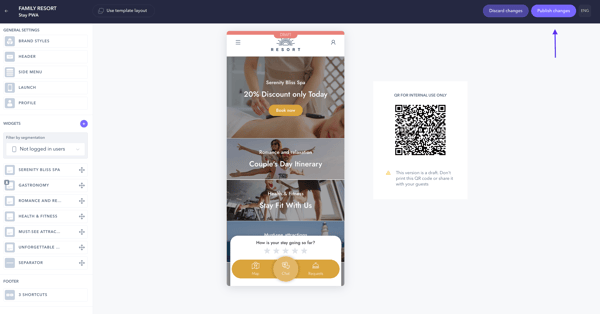
The Edit app screen is where you customize the guest app front page. The front page is the main and first screen of the guest app. From the Edit app screen, you set up the app's layout, content, and structure. The editing menu, which is located on the left side of the screen, is divided into two sections:
- General settings. This is where you set up the design for key elements of the guest app: the header, the menu, the user profile, and the general style of buttons and other transversal elements across the guest app. This is the section you will learn to configure in this article.
- Widgets. This is where you set up the content of the guest app front page by adding new widgets and setting up their specific content and design. Follow this step-by-step guide to learn how to use the widgets section.
Before getting started
Before configuring the general settings, make sure you have the following:
- Access to the CMS: My app
- Brand guidelines: The main color codes, preferred button/element shapes, brand logo files and images.
- Menu content: A clear structure of how your content will be organized into groups and sections within the app menu.
- Translated texts: If serving multiple languages, prepare the translated messages that will be used.
Step-by-step guide
To customize the guest app front page, go to the My app section. Once inside, click on the Edit app button to start editing or making changes. This screen is where you can customize all modules and is divided into General settings and Widgets.
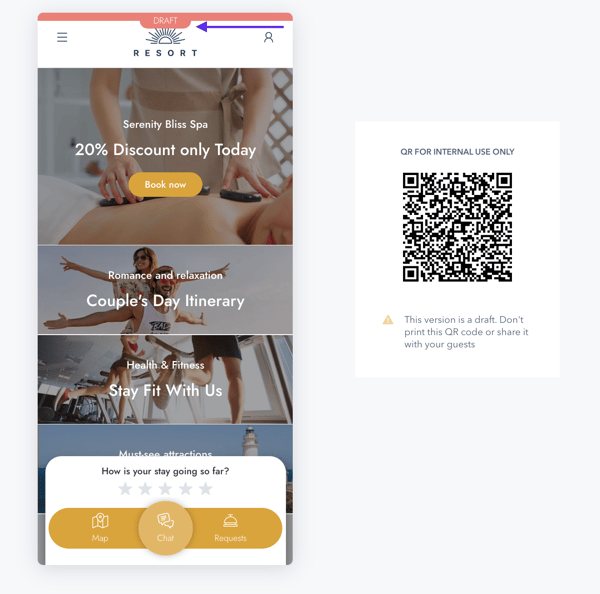
Keep in mind that you'll be working in Draft mode, which lets you make changes and try out different designs. You can preview these tests on the preview screen or by scanning the provided QR code from your smartphone.
Once the final version and is ready to be published, click Publish changes.
Note: Be aware that once published, you won't be able to go back to the previous version.
Step 1: Set brand styles
Inside General settings, under Brand styles, define the overall look and feel of the app to align with your brand guidelines:
- Main color: Choose the color that will be used for buttons and other elements across the app.
- Element shapes: Choose between round or square shapes for buttons and other elements to enhance the app's aesthetic.
Step 2: Configure header styles
Inside General settings, under Header style, choose how the top section of the app will look, which is crucial for brand identity:
- Layout: Select the header type and layout that reflects your brand identity.
- Brand content: Choose whether to display a logo or a text within the header.
- Personalization: Personalize the colors for both the layout and the brand content (logo/text) if needed.
Step 3: Design and structure the side menu
Inside General settings, under Side menu, customize the appearance and structure of the app's navigation menu. The menu displays shortcuts to the sections of the guest app:
A. Design adjustments:
- Use the toggle button to show or hide the menu.
- Choose a logo for the menu.
- Select the background color and the text color for the menu panel.
B. Structure creation:
- Go to the Edit menu section. The menu structure uses groups and sections.
- To create a Group, click Add group and give it a title.
- To add items inside the group, click the Add section button.
- For each section, select a Content source (Hotel Content, Corporate Content, or a URL) and provide a title.
- Use the arrows to rearrange the order of groups and sections, or the trash can icon to delete them.
Step 4: Configure launch option and desktop text
Inside General settings, under Launch, define the welcome message users will see when accessing the guest app.
A. Welcome message:
- Use the toggle button to activate or deactivate the welcome message shown to users the first time they access the app.
- If activated, click Edit welcome message to add a title, a subtitle, and a description.
Note: You will be taken to another section of the CMS: Content > Welcome message. After completing the welcome message setup, you will need to return to the My app section: My app > Edit app.
B. Desktop version:
- Write the text that goes above the QR code used to access the guest app from a desktop.
Step 5: Set profile side menu styles
Inside General settings, under Profile, configure the profile side menu colors and texts
- Header styles: Customize the profile header by choosing the background color and text color.
- Claim text: Input a claim text to invite users to sign in.
- Sign-in button style: Input the desired text for the sign-in button and choose its colors.
Next steps
Now that you've configured the general settings, move to the Widgets section and build the structure and content of your app's front page.
Need further assistance?
If you have additional questions or require further assistance:
- Contact us via live chat
- Send a ticket to our Support team
- Visit STAY Academy, our training platform.