
Overview
Corporate notifications is a feature designed for chains with Corporate apps to create, segment, and launch notifications via push notifications. This features empowers you to deliver targeted promotions and seasonal offers, such as Black Friday deals or loyalty discounts, directly to your guests' smartphones.
A key advantage of this feature is that it does not require CRM integration, allowing you to establish a direct, permanent communication channel with anyone who has downloaded the app. This transforms a one-time visit into a long-term relationship, driving future bookings and guest engagement.
Before getting started
Before creating a notification, please ensure the following:
- You are logged in as a Hotel Corporate user with App 360 permissions.
- The chain is currently managing a Corporate app.
- You have all images, links (with UTM parameters), and translations ready for all languages supported by the app.
Step-by-step guide
Step 1: Access Notifications section
- Log in to the CMS.
- Navigate to the Settings icon (top right corner) and select Corporate from the dropdown menu.
- In the top menu, go to the Notifications section. You will see a table displaying all existing notifications.
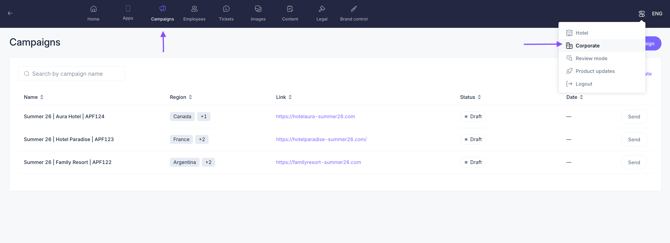
Step 2: Create a new notification
-
Click the Add button. A pop-up window will appear.
-
Set up the general settings:
- Internal name: Enter an internal name for easy identification.
- Target app: Select the app where the notification will be launched.
- Device region: Select the geographic regions to target to ensure content relevance.
-
Set up the notification content:
- Image: Upload the header image that users will see when they open the notification.
- Title: Enter the main headline shown on the lock screen (You must provide translations for all app languages by clicking the flag icon).
- Message content: Compose the body text of your notification (You must provide translations for all app languages by clicking the flag icon).
- Button Text: Define the call to action (You must provide translations for all app languages by clicking the flag icon).
- Link: Enter the destination URL (landing page or booking engine).
4. Click Save draft.
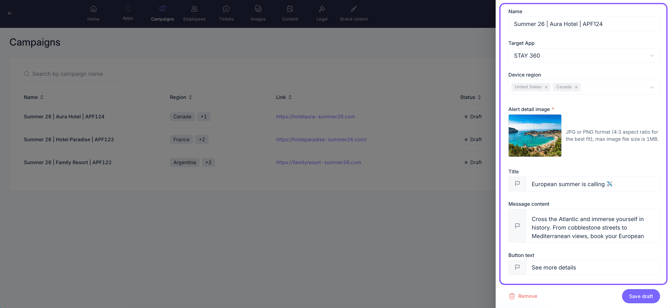
Note on the link: It’s important to include the UTM parameters to track the notification’s performance outside of STAY.
Note on image: There are no specific dimension requirements, as the image will automatically adjust to the device where the notification is displayed. Please ensure the file is in JPG or PNG format and the size is under 1 MB.
Step 3: Manage and send the notification
In the summary table, you can see the Status of the notifications:
- Draft: Configured but not yet sent.
- Sending: The delivery is currently in progress.
- Sent: Successfully delivered to all recipients.
- Failed: A technical error occurred. You can click "Send" again to retry.
Note: Only draft or failed notifications can be edited.
Note: If a notification fails, you can click the send button again to retry. If it fails again, please contact the STAY team.
To send the notification:
- Click the Send button next to your draft.
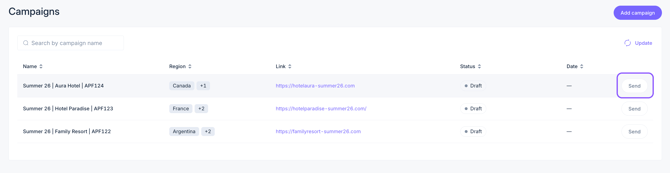
- A pop-up will show the total number of devices that will receive the notification.
- Confirm the action.
- Use the Refresh icon (top right) to update the status in real time.
Warning: once you click send, the process begins immediately and cannot be undone.
Next steps
After sending a notification, we recommend:
- Go to Insights, under the corporate notifications section, to view performance metrics. Check this article on how to use data from the corporate notification section.
- Check analytics using the UTM parameters you included in the notification link.
- Use the results to refine your segmentation for future notifications.
Need further assistance?
If you have additional questions or require further assistance:
- Contact us via live chat.
- Send a ticket to our Support team.
- Visit STAY Academy, our training platform